Final 6 Line up.. Based on the colour study I chose below!
Urban Environment
Friday, July 22, 2011
Sunday, March 13, 2011
Working With Fabric
The following week we continued to manipulate our paper shapes ont the mannequin. When I felt I had used them in every way possible I moved on to my fabric shapes. I did the same as with the paper, but I had to use a heavy weight, medium weight and a light weight so that i could see the different ways the material fell and created a completely new look. For example the chiffon i used was very hard to manipulate into the shape i desired. I had some control but it creates a more flowy and draped look compared to the leatherette I used which held the shape I wanted completely.
Heavy Weight: Leatherette
Medium Weight: Cotton
Light Weight: Chiffon
I really loved working with fabric on the mannequin, it was much easier than working with paper. My favourite material was the medium weight, I liked how i had a certain amount of control but it also has it's own mind which added to the character of what I created. Rather than the leatherette which appeared very stiff.
Fashion Week 1
After picking my two shapes, I started by placing them on my croquis. I exhausted both my shapes by turning them upside-down, over-lapping and using different sizes.
On Tuesday we had a colour studies workshop, which I loved. Over the week we had to complete four colour studies using contrasting moods.
On Tuesday we had a colour studies workshop, which I loved. Over the week we had to complete four colour studies using contrasting moods.
On wednesday we had a workshop about Fashion illustration, which explained how importatnt layout and presentation is in the industry. This was so helpful when it came to creating the pages of my sketchbook with a bit more energy and character! We also had a mini project where we had to use materials to drape on the mannequin and then draw it from different angles. This was very useful because it helped my drawing skills as well as learning how to draw your designs straight from the mannequin.
After exhausting my two shapes on the croquis I cut out each shape on paper, using small, medium and large sizes so that i could manipulate them onto the mannequin.
I created this piece using my first shape. For such a simple neck piece it was the shape i was most happy with when I used it to place on my croquis.
These paper experiments are few of many that I created using both my original shapes.
I then exhausted these new shapes and placed them on my croquis in different ways and scales creating not full outfits but pieces, such as, skirts trousers, tops, sleeves, waistbands (etc.).
I really enjoyed working with the paper on the mannequin, it was much more exciting than working on my croquis' in the sketchbook. It made me more aware of all the possibilities by working in a three dimentional way.
Saturday, March 12, 2011
Fashion Elective
We started this project by selecting an object of interest to us, influenced especially by shape.
I chose Flies because of the unusual shapes I found from magnified images.
I love the shapes and colours found in these images of fly faces. They are very unusual and interesting for such a common insects.
From our source we made some analytical drawings and then drew every shape we could find from the image. Then i chose my two final shapes to work with for the rest of the project, making sure they were different but complimentary to each other.
Wednesday, March 2, 2011
Sunday, February 27, 2011
Naked Raku
When we had finished our pieces they were put in the bisque kiln. When ready they could be glazed. The technique we used was 'The Naked Raku Process'.

Before the Bisque kiln.
These are some wire pieces. We explored the forms we made with wire and also used wire to create a piece that would enhance our vessel.
When placed in the kiln, it had to reach 1000 Degrees before they could be removed gently with a tongs.
Then they were placed in the reduction chamber with lots of sawdust and left for up to 40 minutes. This is where the magic happens!
Et Viola!

These beautiful metallic surface is what we firt see when thay have cooled down and been taken out of the reduction chamber.
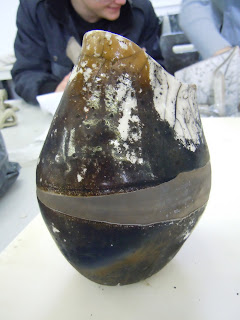
But... This is how the finished pieces looked. Eventually that lovely brown colour will chip off because of the resist used, this creates an egg shell like surface.
And these are my three finished vessels!
Saturday, February 26, 2011
Ceramics Elective
We were given a brief which contained an image by Karl blosfeldt. From this we were to develope forms and mark makings using the image as inspiration. We used ink to do this and a variety of tools.

We then made some maquetes using clay to develope some forms from the observations we had made. After this we were shown the different ways to create a ceramic piece, ie. coiling, slabbing and pinch potting. From this we started to develope our own pieces, i decided to use pinch potting and coiling to create vessels.
Subscribe to:
Comments (Atom)


